According to a Marketing Sherpa study, a massive “79% of marketing leads never convert into sales [and] a lack of lead nurturing is the common cause of this poor performance”. This statistic is so surprising that we recently dedicated an entire blog post to the factors involved, as well as exploring the fundamental components every life science company should put in place to enable effective lead nurturing.
In this follow-up blog post, we delve a bit deeper into three specific lead nurturing workflows that we’ve seen work well for life science companies in the past. We call these workflows “Nudge”, “Accelerate” and “Stay In Touch”. Using these workflows, we’ve been able to significantly improve email open rates, click-through rates and other important success metrics. Read on for a full breakdown of each workflow, as well as how they can work together to help convert more of your life science leads into customers.
The three lead nurturing email workflows
The building blocks of the workflows
Before we get into the email workflows themselves, let's talk a bit about the components that make up each workflow: emails, content offers, delays and actions.
Emails
Each step of the workflow involves sending an email to a lead. We recommend using smart tags captured in your CRM database to personalise your emails with things like the lead’s first name, company etc. In general, you’ll usually want to include only one offer/call-to-action in each email, but do consider experimenting to see what works best for your leads.
Content offers
In most cases, your emails will be promoting content offers that are likely to be of interest to each recipient (e.g. blog posts, case studies), rather than offering things like discount codes or driving people to your website homepage. While it is tempting to gate these content offers behind a landing page, we recommend using as much ungated content as possible – you already have the contact details of each lead, and you want to make it as easy as possible for them to access the content.
In the workflows covered in this blog post, we refer to sending three different types of emails, which cover a simple model of a prospect’s buying journey: awareness (eBooks, whitepapers etc.), consideration (buying guides, case studies etc.) and decision (product information, brochures, demo videos etc.). The buying stage denotes the type of content offer you should promote in each email (for more info on what these buying stages mean, as well as ideas for content you could create at each stage, please see this blog post on the fundamentals of lead nurturing).
Delays
One of the key characteristics of lead nurturing for life sciences is to send new content to your leads over time, so you’ll need to introduce delays between each email. These delays can vary a lot in nature, from a few minutes up to weeks or even months. While you’ll want to strike while the iron is hot, the key is to find the right balance between not annoying your audience with incessant emails and ensuring the gap between your emails is not so long that your audience will forget who you are!
Actions and logic
As your leads progress through the workflow, you’ll want them to follow different paths depending on the actions they take, the content they interact with etc. The simplest way to do this is to use splitting logic, where the next step in the process is driven by whether the lead opened the last email, clicked on it to view the content offer, or ignored the email completely. Building this logic into your workflows is much easier and faster if you are using an email automation tool like Pardot, HubSpot or Active Campaign.
With the core components covered, let’s move on to the three workflows.
Workflow 1: Nudge – Identify and influence contacts who might be interested in buying
The first email workflow we’ll cover is called “Nudge”. This workflow works best with leads whose buying intent is currently unknown. As such, this workflow is especially effective for engaging new leads (that have not displayed clear buying intent), as well as old or lapsed leads in your database. For many companies, these descriptors cover the majority of their leads, particularly as only a small proportion of the market are likely to be buying at any given time, making Nudge an especially powerful workflow.
The Nudge email workflow has three primary goals: First, we want to softly engage with these leads on their terms by offering them something of value, rather than trying to sell to them. Second, we want to start to build trust and show that we are an expert in the field (i.e. that we are well placed to help them solve their challenges and achieve their goals). Finally, we want to try and identify what their main interests are, as well as if they are ready to move further down the buyer’s journey towards making a purchase.
An outline of how the Nudge workflow operates is shown in the graphic below. The key inflection points depend on the actions taken by email recipients i.e. whether they open the email, click a link or ignore the email entirely. Depending on the action of each recipient, we push them through different pathways within the workflow.
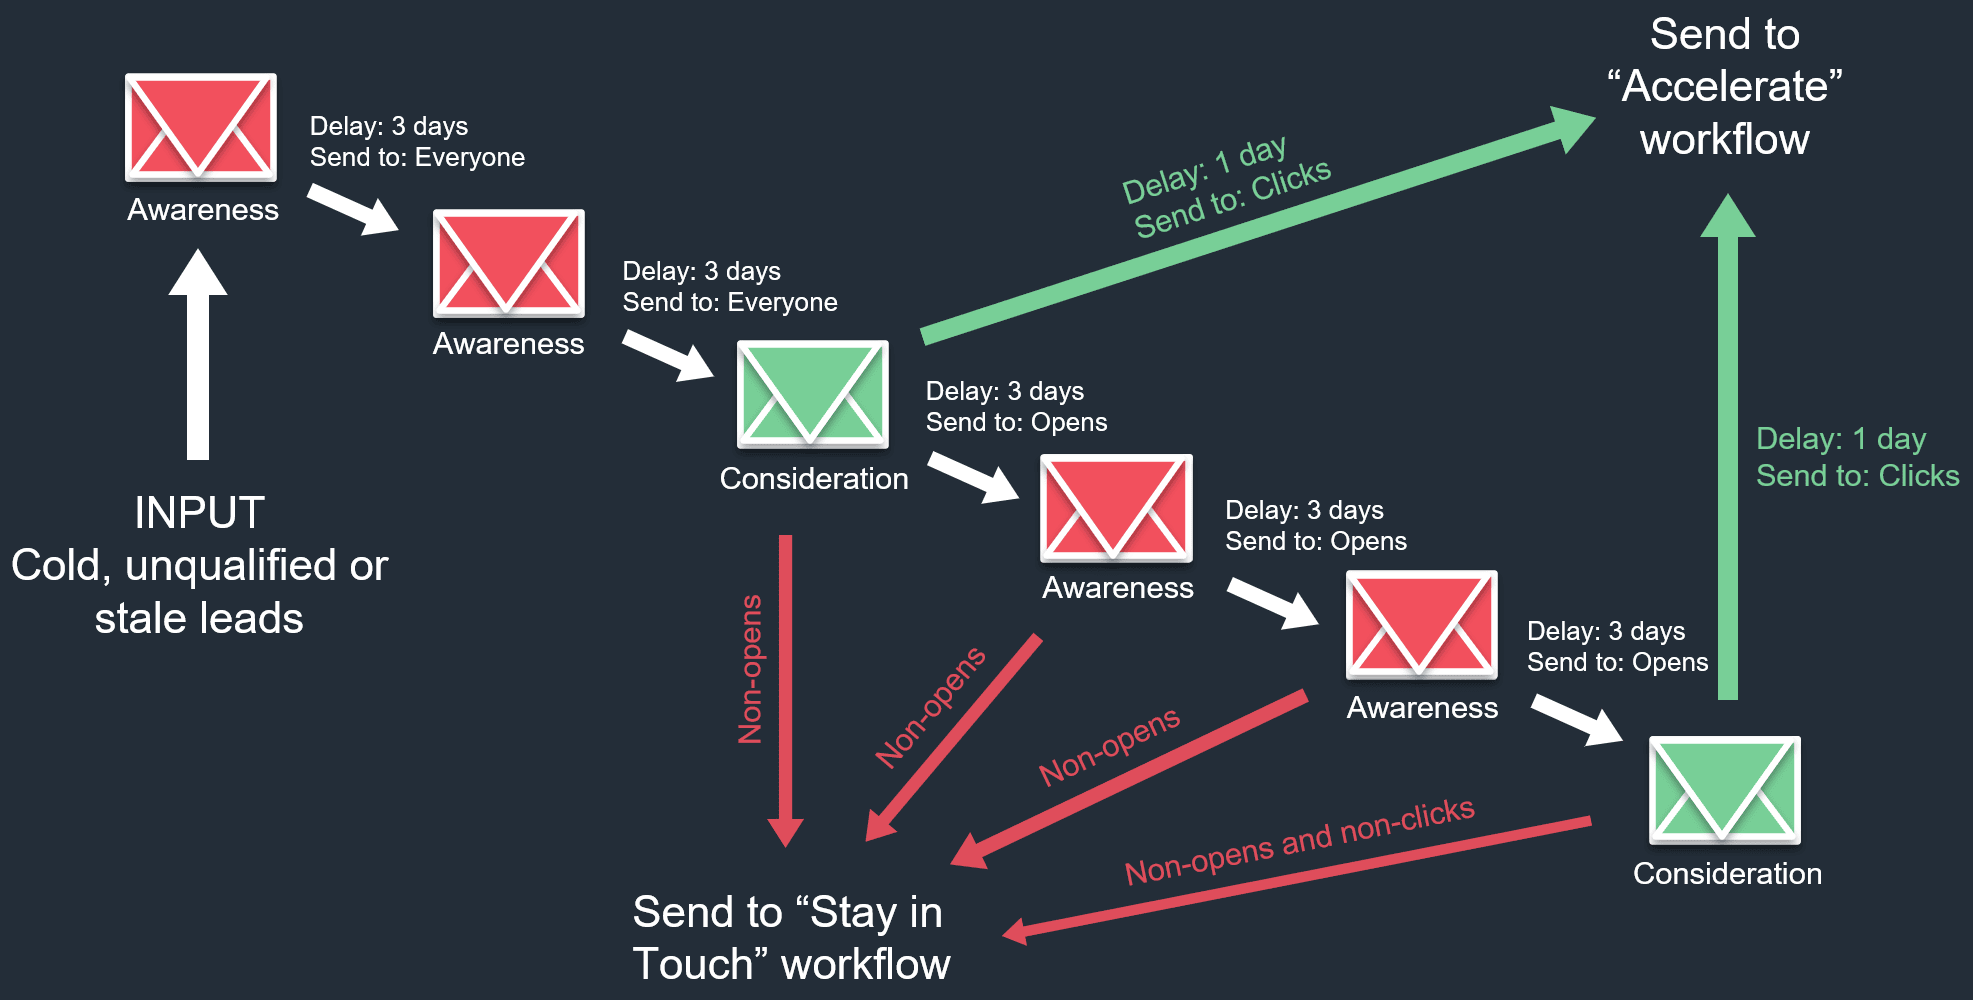
The Nudge strategy involves first providing our prospects with awareness-stage content, designed to educate, inspire, inform, or entertain them. We should aim to provide content that is so valuable and useful that the prospect would not be doing their job effectively if they didn’t at least skim read it.
After sharing a series of awareness-stage offers, we attempt to “nudge” them with a piece of consideration-stage content to see if they show interest. If they respond to our nudge by engaging with this content, this indicates that they might be closer to selecting a solution. At this point, we can push them into other workflows designed to speed up their purchase process (such as our “Accelerate” workflow, discussed later in the blog post). We can also feel confident that we are starting to influence them about the value of our solution.
There are a lot of things we can vary within this workflow to see what works best for a specific product, service or audience. These include:
- Shortening or increasing the delay times at each stage.
- Changing the amount of awareness-stage offers we send before sending a consideration-stage offer.
- How many times we repeat the cycle of nudges before we just push our leads into the Stay in Touch workflow (covered in more detail below).
At the end of the workflow, leads will have been pushed in one of two directions: into the “Accelerate” workflow, which we turn to next, or into the “Stay in Touch” workflow, which we explore later in this blog post.
Workflow 2: Accelerate – Push warm leads deeper into your sales process
“Accelerate” is the second of our three workflows. It aims to identify contacts who are ready to buy. You’ll want to use this workflow for relatively warm leads, such as those that have responded to the Nudge workflow, or those that have otherwise shown a clear buying need and are actively looking for a solution. An outline of the Accelerate workflow is shown below:
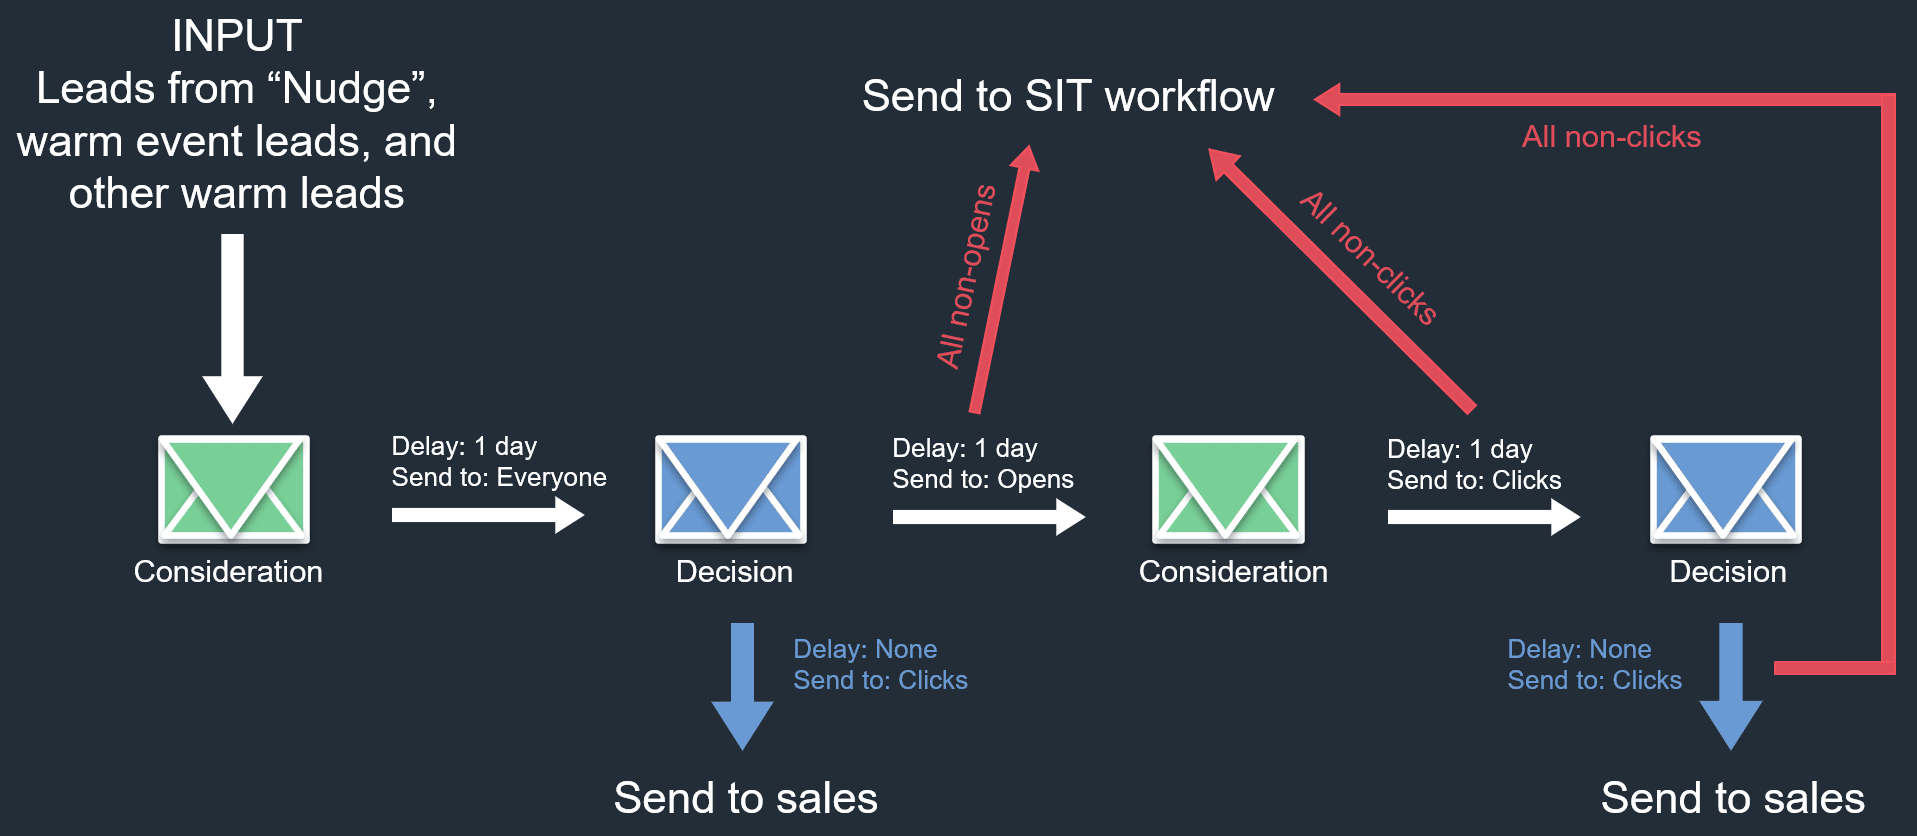
At the start of this workflow, the first thing we do is send our prospects a consideration-stage piece of content to verify they are truly looking for information on the solutions available. If they respond to this, we can then send them a decision-stage offer to directly pitch our solution to them. Finally, if they show interest in this content, we can pass them on to the sales team. If they don’t engage with the decision-stage offer, we repeat the loop an additional time to see if we can get them to take an action and connect with our sales team. If not, we push them to our Stay in Touch workflow, which we’ll cover in more detail next.
Workflow 3: Stay in Touch – Stay top of mind with contacts who aren’t ready to buy yet
Even if our contacts don’t engage consistently with the consideration- or decision-stage content we’ve sent them in the previous two workflows, they could still be a potential customer. Therefore, to make sure we don’t miss out on future opportunities, we can push these prospects into the “Stay in Touch” workflow. This allows us to keep our company top-of-mind, while also monitoring where our prospects currently are in their buying journey.
The Stay in Touch workflow is very simple and is based on the principle of a standard email newsletter, sent monthly or quarterly. However, where it differs is in the structure of the newsletter. In essence, we build the newsletter in such a way as to ensure that every month we are sending at least one piece of content covering every stage of the buyer’s journey (awareness, consideration and decision). Not only does this ensure that we can cater for readers at different stages of the buying journey, we can also monitor which content they click on as a readout of where they are in their purchase process.
The schematic below shows an example Stay in Touch newsletter. While it only includes three pieces of content, this does not preclude us from adding other content items if we wish. What’s more, decision-stage content doesn’t just need to be product information, case studies etc. – it can also include things like discount codes, news about upcoming product updates/launches and so on.
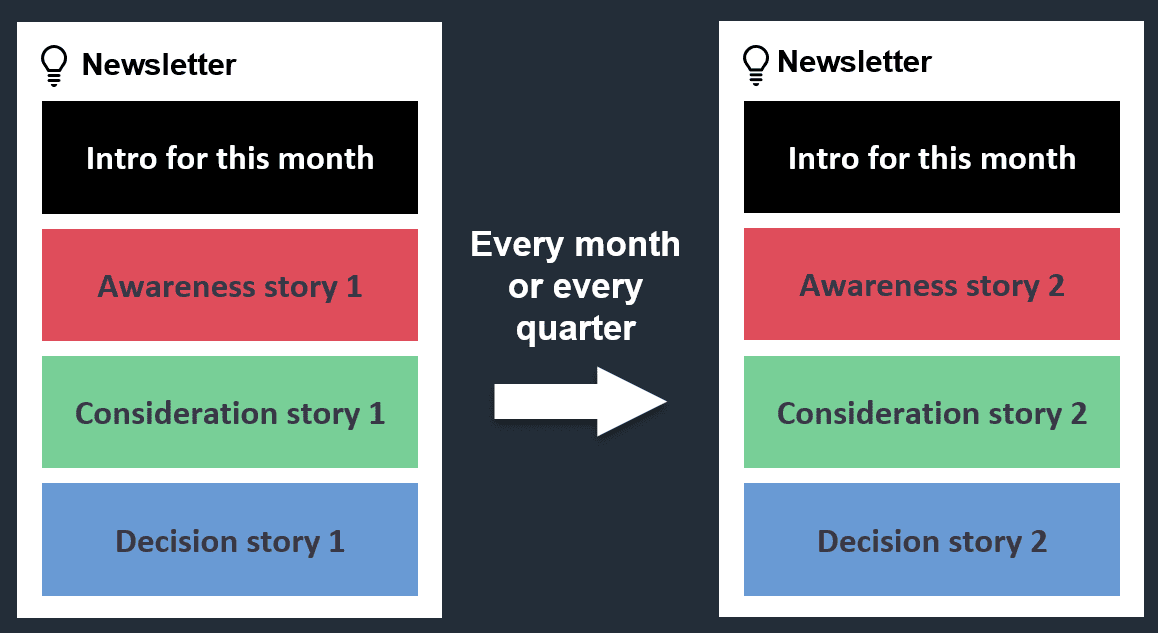
By assessing which content items your prospects engage with, you can continually keep tabs on their progress within the buyer’s journey. What’s more, since the contacts will continue to regularly receive high-quality content from you, your brand will be top of mind when they’re ready to buy.
Which workflow should you build first?
While the Nudge, Accelerate and Stay in Touch workflows are designed to work well together, you don’t need to have all three in place to get started. In fact, we are often asked by clients which one they should build first. In general, we recommend starting with the Stay in Touch workflow first and committing to a monthly or quarterly newsletter that includes fresh, new content covering each stage of the buyer’s journey.
From there, the next workflow to build is Accelerate. You could experiment with inputting leads from different sources to see how the workflow performs (including pushing all new leads through it to begin with). The downside of this approach is that your email communications with the prospect could come across as “too salesy”, especially for prospects at the start of their buying journey. If this appears to be the case (as illustrated by poor engagement with your emails), then it’s time to build out your Nudge workflow. You can then use the Nudge workflow to build trust with leads by sending them high-value awareness-stage content (and only sending them content on your solutions when you see signals that they might be ready to buy, for example, when they engage with consideration- or decision-stage content offers).
While the Stay in Touch workflow will add value for any business, you should consider this key question before building out your Nudge and Accelerate workflows: How many leads do you regularly generate a month? Creating complex workflows to manage just a few new leads a month is unlikely to be worth the time investment. Instead, it might be better to just push those leads directly to your sales team for them to follow up with manually. As your monthly lead volume grows, you will reach a tipping point at which your time (and the time of your sales team), is best spent on other things – this is the moment to invest in building a more complex lead nurturing workflows like Nudge and Accelerate.
The three fundamentals that make these workflows successful
While the logic behind these workflows is very robust, they only work well if you have all the fundamentals in place to enable effective lead nurturing. Indeed, this is so important that we have written an entire blog post on this subject. In summary, the three pillars of effective lead nurturing are:
- Segment your database of contacts, ideally based on their needs, interests, goals and challenges (rather than relying too much on general demographic information like geographic location or company size).
- Create truly valuable content that will be super compelling to your target audiences (based on their needs, interests, goals and challenges).
- Automate your approach using software to reduce the amount of time you must invest in managing the lead nurturing process, while also making it more straightforward to track user behaviour and report on results.
Harness the power of these three workflows for your life science marketing efforts
By implementing our “Nudge”, “Accelerate” and “Stay In Touch” workflows, you can begin to build an effective lead nurturing program. In particular, by sending the right content, to the right person, at the right time, you should see higher open rates and click-through rates, and ultimately, you’ll improve your conversion of leads into customers.
However, configuring your systems to set up these workflows can be a complex and time-consuming task. Therefore, to help you streamline the process of implementation, we’ve put together a free lead nurturing starter pack. In this pack, you’ll receive a handy template to help you define relevant buyer personas and plan your own Nudge, Accelerate and Stay in Touch workflows. Additionally, if you’d like some personalised tips on how to unleash the potential of your contact database, get in touch with our team and one of our experts will be happy to discuss how to tailor the process to your needs and goals.
To get started with effective lead nurturing, download your free template starter pack today.